| ArtisticHobbies.com |
|---|
| Hobby Resources * Model Building Projects * Modeling Resources * YouTube Channel |
| OTHER WEBSITES * Artistic Reefs |
Taigen Metal Tiger I Kit Build - Page #5
The next 2 pictures show the camouflage red/brown airbrushed on. For this I used Model Master Burnt Sienna, which closely looks almost identical to the Krylon Ruddy Brown Spray Primer I used at the beginning to prime all the metal parts.
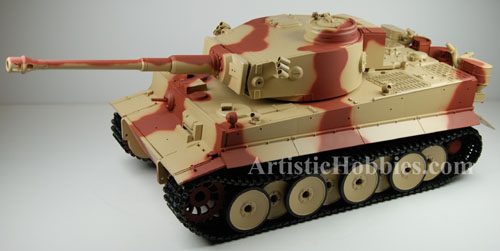
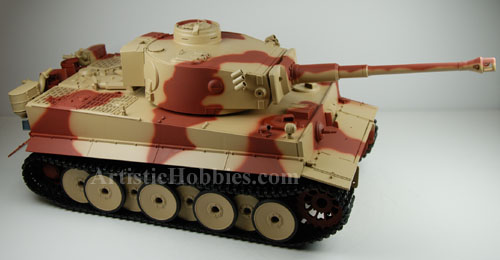
I did paint the turret while it was off the upper hull to prevent any over spray. A great deal of planning is required when it comes to camouflage painting. A good thing to have on hand is either pictures or drawings of the camouflage design you want on your tank. For me I just used my King Tiger as reference since I wanted this camouflage paint scheme to look like they may have been in the same theater of operations back in WWII.
If you have any paint over spray from painting that red, leave that alone until you are finished spraying your green.
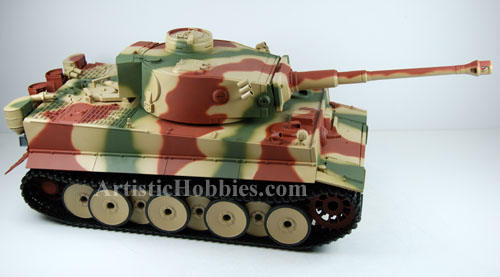
The next 2 pictures below show the dark green airbrushed on. For this I used Model Master Dark Green.
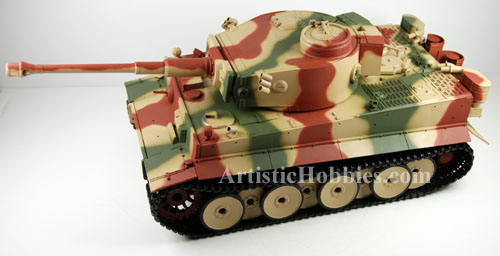
Now is a good time to look over your painted tank and see if there may be some areas that may need touching-up. For me, I will be touching up a few area with my Light Sand color and sanding because I found that I had some over-spray areas of green and red.
If you have any over spray, you can also use a 280 grit sanding sponge and lightly sand those areas. You can also lightly sand the edges of the painted red and green camouflage as well to give you crisp edges. Not much pressure is required when doing this and take you time as well!
You may be saying to yourself? Wont the sanding leave scratch marks. Yes, but only very fine scratches and almost unnoticeable if sanding is kept to the lightest color, which in my case is the light sand color. If the scratches really bother you, you can always spray a flat dull or clear coat over everything and that will eliminate the fine scratches all together.
For me, the sanded scratches are staying because I feel they wont be that noticeable and will add a worn look as well to the Tiger I tank and that’s if you can really see the lightly sanded scratches at all. Don’t forget, if your using the 280 grit sanding sponge I suggested above or similar. The sanding scratches will be very fine and almost unnoticeable in most light.
Don’t forget everything, this is just paint and all paint can be either touched up or just re-painted if you really don’t like it. The only rule I have about painting is, just have fun and remember there’s no right or wrong in the way you do it, at least in my book!After you have finished touching up the paint, it’s then time for the fun part of the build at least in my opinion it is and that’s putting on your accessories. The accessories are were you can personalize your RC tank and make it your own and make it stand out from everyone else’s RC tank.
The kit comes with some nice accessories to put on your Taigen Tiger I tank. This first picture below shows the tow cables, which are pretty nice out of the box but I’m going to paint them to highlight certain areas to go with my camouflage theme.
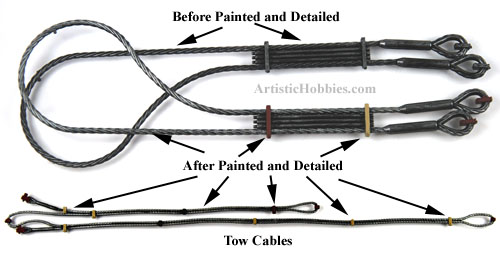
To help make the cable stick out more, I lightly rubbing Model Master Steel paint all over the cables using a cloth or something that is lint free. Just lightly rub it on because you don’t want the paint to get into the groves of the cables which are a blackish color. If you get to much on, than just rub it off and start over.
The tow cable hangers and latches I painted using the red and green, which I used for the camouflage colors shown above.
| Home |
| Copyright © 2009- 2024 ArtisticHobbies.com - All rights reserved |