| ArtisticHobbies.com |
|---|
| Hobby Resources * Model Building Projects * Modeling Resources * YouTube Channel |
| OTHER WEBSITES * Artistic Reefs |
Tamiya 1/16 Full Option King Tiger Tank - Page 7
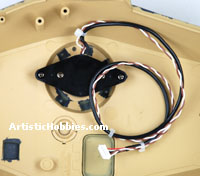
Once all your paint is dried, you can now start on steps 25-27, which entail assembly of  fenders, turret motor and guide wheels for the turret. Pictured right is the turret motor held in place by 3 screws and 3 guide wheels, which one is hidden underneath the turret motor. These several stages are very easy to do and can be finished in about 30 minutes time.
You will notice I have blue tape holding wiring on the upper hull. This is just to keep the wires out of the way for the time being.
Stages 28-33 entail assembly of the turret, main gun and battle unit if being installed. If you are installing a battle unit and have already purchase one. This is a good time to install the base for the battle unit pictured below. It’s very easy to install and instructions are on stage 31 of the build manual.
 Once installed, tape the wires to the side of the hull to keep the wires out of the way for the time being.
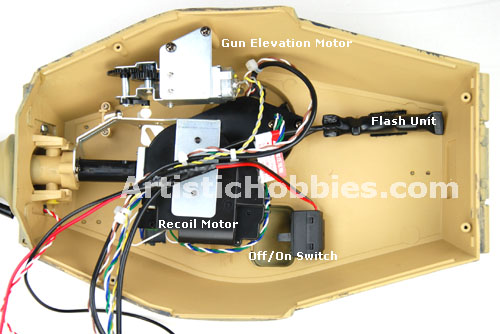
Next comes installing the main gun and motors into the turret. Pictures below you will see the gun elevation unit, recoil motor, flash unit and the on/off switch. The directions for installing the on/off switch shows being installed underneath the turret, which doesn’t make any sense to me since you wouldn’t be able to get your fingers underneath the turret to turn it on unless the turret was turned to the left or right. So I placed the on/off switch on the upper turret by a hatch opening, which is easy to get to now. The switch is held in place with double side tape, which is included with your model.
Stages 34-35 entail installing the lower turret, gear and a counter weight. The counter  weight is placed on the lower hull held in place with double sided tape. This counter weight is used to offset the extra weight from using the metal gun barrel, which is included in your kit.
Now your ready to install the turret onto your upper hull, which can only go in one way pictured here. One of the nice things I found about building this model was that parts can only go on one way. So it makes it almost impossible to install a part together in the wrong way.
One of the things you will have to manage is all the wires that come out from the turret. Included in your model kit are several small white cable ties, which can be used to tie all the wires together.
| Home |
| Copyright © 2009- 2024 ArtisticHobbies.com - All rights reserved |