Once the dirt is dry, you are ready to add some green moss around the rocks and 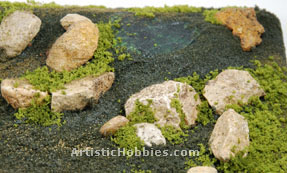 different areas of the dirt. Again, I used my mixture of glue and sprayed any area that I wanted the moss (Light Green Course Turf). Work on one area at a time by sprinkling your moss on top of your sprayed area and pat the moss down with your hand. Once your finished with that area, re-spray the moss with your glue fixture. Then place some additional moss over that. This is called layering. different areas of the dirt. Again, I used my mixture of glue and sprayed any area that I wanted the moss (Light Green Course Turf). Work on one area at a time by sprinkling your moss on top of your sprayed area and pat the moss down with your hand. Once your finished with that area, re-spray the moss with your glue fixture. Then place some additional moss over that. This is called layering.
As you can see the diorama base is starting to take shape. Remember that this is your interpitation of what this scene should look like, so have fun!
Now that I have some moss laid down especially on the hill where the big tree is going to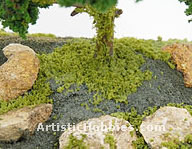 go. The reason I didn’t glue the tree in place first is because it would be hard to add moss underneath the tree once in place. To glue the tree in place I used super glue, which will dry pretty fast so I can continue working around the tree. With the tree glued down I can continue adding more moss around the base of the tree to blend everything together as seen here (right). go. The reason I didn’t glue the tree in place first is because it would be hard to add moss underneath the tree once in place. To glue the tree in place I used super glue, which will dry pretty fast so I can continue working around the tree. With the tree glued down I can continue adding more moss around the base of the tree to blend everything together as seen here (right).
Now I can get started adding some shrubs and bushes around the rocks or wherever you like using Woodland 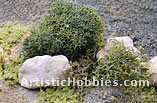 Scenics medium green Lichen. Right out of the package the Lichen is one big clump, so you will need to pull off what you need as you go along. Once you find a good area for your bushes. Take some Elmer’s glue and place it in the area you want the bush. Then firmly press your bush into the glue. If you think you might need more glue on the bush, than take your glue mixture and spray the glue into the bush. Scenics medium green Lichen. Right out of the package the Lichen is one big clump, so you will need to pull off what you need as you go along. Once you find a good area for your bushes. Take some Elmer’s glue and place it in the area you want the bush. Then firmly press your bush into the glue. If you think you might need more glue on the bush, than take your glue mixture and spray the glue into the bush. The glue mixture will drip down into the bush, which will make contact with the surrounding area and seal things up for you. The glue mixture will drip down into the bush, which will make contact with the surrounding area and seal things up for you.
Once you have all your bushes and shrubs in place don’t be afraid to add more moss or rocks around your bushes to add that extra detail. Just make sure you glue everything down really good. As you can see your diorama is really starting to look like something with the bushes in place.
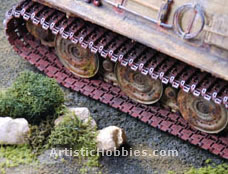 At this point I wanted to place the tank onto the diorama to get an idea in what everything is going to look like. You will notice in this picture (Left) that the tread on the tank are slightly elevated off the ground. You have two choices here, either leave it this way if it doesn’t bother you or like I did, I wanted the tread to be flush with the ground. Don’t forget, a tank weighs thousands of pounds and the weight of the tank is going to sink the tread into the ground a little. At this point I wanted to place the tank onto the diorama to get an idea in what everything is going to look like. You will notice in this picture (Left) that the tread on the tank are slightly elevated off the ground. You have two choices here, either leave it this way if it doesn’t bother you or like I did, I wanted the tread to be flush with the ground. Don’t forget, a tank weighs thousands of pounds and the weight of the tank is going to sink the tread into the ground a little.
Since I’m going to sink the tread into the ground you have two choices in accomplishing this. Either add very small rocks and shrubs next to the tread to hide the slightly elevated tracks or like I’m going to do is actually dig into the diorama base to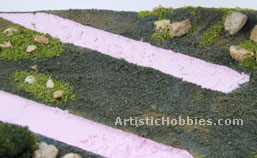 create a path for the tracks to sit into. Yes, this means cutting and digging into your base. Make sure you only dig into your base as wide as your tracks or it won’t look good. Either take measurements of your tracks while on your tank or take the tracks off your tank and place them on your base, then draw pencil lines along the edge of the tracks. Then I took a flat edged X-Acto blade and started cutting into the base until the path was 1/8th deep as shown here. create a path for the tracks to sit into. Yes, this means cutting and digging into your base. Make sure you only dig into your base as wide as your tracks or it won’t look good. Either take measurements of your tracks while on your tank or take the tracks off your tank and place them on your base, then draw pencil lines along the edge of the tracks. Then I took a flat edged X-Acto blade and started cutting into the base until the path was 1/8th deep as shown here.
Page 5
|