| ArtisticHobbies.com |
|---|
| Hobby Resources * Model Building Projects * Modeling Resources * YouTube Channel |
| OTHER WEBSITES * Artistic Reefs |
Armor Diorama Build - Part 5 |
Place your tank into your path several times to make sure everything fits well. Once your happy with the path it’s time to get painting again. So I got out my acrylic black paint that I bought at Wal-Mart and pure the paint into the paths. Spread the paint around by using an old paintbrush and work the paint into all the nooks and crannies. While the paint is still wet, cover the entire area with your Woodland scenics dirt you used before and let everything dry overnight. The next day blow off the extra dirt from your path to make sure everythings covered really well. If you find any areas not covered by the dirt than re-apply the dirt to those areas and spray your mixture of glue/water onto the dirt. While you’re doing this add some moss to your path for some extra detail. When I was outside looking for small rocks I As seen here, your diorama is almost finished. Place your tank onto your diorama and see The total cost to build this diorama ran about $50.00 or less. All of the materials you will buy for this project wont all be used up on this one project. You will have leftover material for several other diorama projects, so your up-frond cost can be spread over several projects, not just this one. We hope this tutorial gives you some insight in how to build your own diorama. It’s doesn’t take rocket science to build a diorama, it just takes practice. Plus this project can be fun for the entire family and a great way to get others involved in model and diorama building. Back to Model Building Project Page
|
 also found small twigs and branches. Now is a good time to place some in your scene while your waiting for your path to dry. As seen here (Left) small branches can go a long way in adding detail. Once you find an area on your diorama base you want to place your branches or twigs, glue them down using your Elmer’s glue. The places you added the Elmer’s glue to hold down your branches, add some moss to those areas. You can even add some green moss to the branches themselves for more detail.
 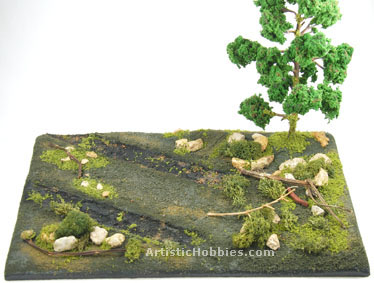 how everything looks and what extra detail you can add to it if any. Make sure you don’t neglect to back side (Rear) of your diorama that won’t be seen very much or covered up by the tank. Keep in mind a diorama or scene has a front, left and right side and a rear side. It’s the rear side that most people forget to add detail to. The rear of your diorama should have just as much detail as the front.
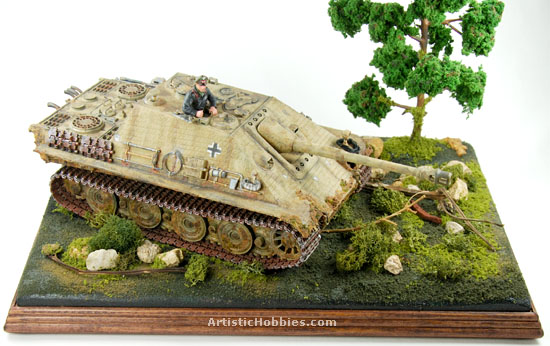
| Home |
| Copyright © 2009- 2024 ArtisticHobbies.com - All rights reserved |