| ArtisticHobbies.com |
|---|
| Hobby Resources * Model Building Projects * Modeling Resources * YouTube Channel |
| OTHER WEBSITES * Artistic Reefs |
Tamiya 1/16 Full Option King Tiger Tank - Page 2
As going through the build manual you will notice that they use a lot of picture symbols throughout the entire manual to help you with the build. I found this to be very useful and takes away any confusion that might be associated with a build of this size.
In the picture below you will notice in the left lower corner of the page highlighted in blue all the hardware that will be needed for that part of the build. Those hardware numbers can be found on your 4 page parts list, which will tell you where to find the parts or what bag they will be found in.
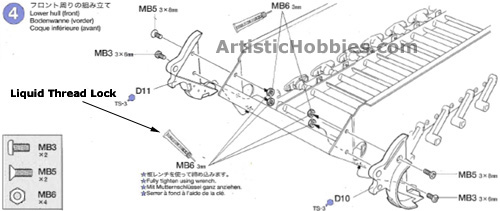
Also you will notice they use symbols like where to use liquid thread lock pictured above. Liquid thread lock and grease is included in your kit.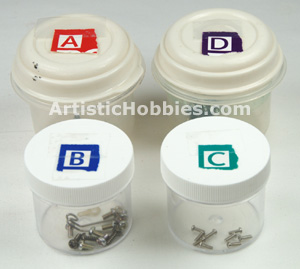
After reading everything probable more than once it’s time the get organized. One thing I highly recommend is to put all your nuts, bolts, washers and screws into separate plastic jars. With your kit you will get 4 different bags of nuts, bolts, washers, screws labeled A-D. Put all you’re (A) nuts, bolts, washers, screws into a plastic container and then label it (A) on the top of the container pictured here and do so for all the other bags.
The bags that the nuts, bolts, washers and screws all comes in can break very easily so by putting everything into plastic containers will save yourself from picking nuts, bolts, washers, screws off the floor. Trust me on this one!
Next comes your tools you will need for your model. The manual tells you all the tools that will be needed for the project including a soldering iron, which you will NOT need for this model build.
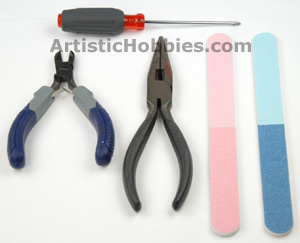 4 of the main tools you will need for this project will be a good pair of wire cutters, small and medium screwdriver, needle nose pliers and a filing board.
The small screwdriver, make sure its magnetic so it can pick up the small screws from inside your plastic containers. Having this sure help a lot! The medium screwdriver you will need about twice in your build
The wire cutters are for cutting all your plastic parts from the plastic parts grids. Most people will just twist the parts off but this can leave you with a big gash in your parts. By cutting the parts off with the wire cutters, you get a nice clean break.
The filing board will come in handy for sanding down all your plastic parts. Pictured you will see a two side filing board with 4 different grits. Having 4 different grits on one board saves you from having 4 different sanding papers.
The needle nose pliers are used for holding nuts in place and placing plastic parts on your model.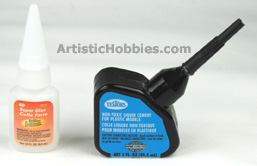
One thing that doesn’t come with the kit is glue. Make sure the glue you buy is for plastic. For this build I used either Super glue or Testors non-toxic cement. I mostly used Testors non-toxic cement and one bottle is all you need to do your entire model. The glue you need is for gluing parts outside of the model. All the parts inside your model are screwed on.
| Home |
| Copyright © 2009- 2024 ArtisticHobbies.com - All rights reserved |