| ArtisticHobbies.com |
|---|
| Hobby Resources * Model Building Projects * Modeling Resources * YouTube Channel |
| OTHER WEBSITES * ArtisticReefs.com |
1/25 model - German Tank Destroyer (Page 4) |
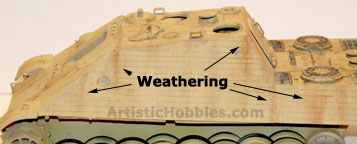
Next came the weathering. For this particular project I wanted the tank to look like it’s been in the field for a very long time. So that meant adding drips, stains, dirt build-up and scratches. As pictured here, I added quite a bit of rust drips to the sides of the tank using Model Master Burnt Sienna (4607). The Burnt Sienna was diluted by 60% with water and brushed on very lightly using a fan brush in a downward stroke motion. Over the Burnt Sienna I applied a very diluted Earth Red (4707) and black (4768) to highlight the drips. Dilute these colors as much as 80% with water. In between each color I washed my fan brush really good with water and lightly dragged the wet fan brush downward over your drips. This blends the colors together. Next came adding road dirt to the tank, which gives your tank a more rustic look. My dirt mixture only contains five parts, 2 different kinds of sand, Elmer’s glue, course turf and a What you do is dip your paintbrush into the diluted mixture of glue and then dip your paintbrush into the sand. Then either dab or scrape your paintbrush in the area you want At this point, let everything dry overnight. Once everything is dried, go over your dirt with different colors of brown and black paint. Make sure the paint is diluted at least 50% with water and then let everything dry overnight. The dirt was placed on the front, rear and underneath the fenders and I even added dirt to the wheels to give this old tank a real weathered look. Next came painting the soldier. There something about painting faces that can be quite intimidating if you’re a first timer. The VsTank comes with a tank commander, which I used in this project. But he needed some extra TLC to make him look like a real tank commander. As you can see he’s pretty faceless and body gaps needed to be filled in.
Next comes the fun part, the eyes. I used 2 colors for the eyes, Model Master acrylic white (4769) and black (4768). To make the eye’s I took a toothpick and filed down one end until I got a very sharp point. To help me see the eyes better I used a magnifier glass (EXC55675). Lightly dip the sharp end of the toothpick into the white paint. You should have almost no paint on the end of your toothpick and then just follow the contour of the eye with the white paint. Keep doing this until it looks like an eye and then let dry for 15 minutes. Now the eyeball, take your toothpick again and dip into the black paint. Dab the black paint into the center of the white eyeball. Just one dab will do and you’re finished. The eyes takes practice so take your time to get this part right. The eyebrows are next, for this I used diluted (50/50) earth red (4707) and used the toothpick as before. Use the magnifier glass to help see what your doing. You just need a hair line of paint to make the eyebrows look good. |
 paintbrush. For the sand I used brown (AH120) and medium brown sand (AH130) mixed together and alone. The
 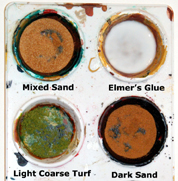 your dirt build-up. When you are finished adding the dirt, clean off your paintbrush in cold water and then dip your brush into the glue. Cover the entire dirt area with glue. At this point you can sprinkle some light green turf in very small amounts to the dirt. I even added some field grass (WOO172) to give some area’s texture.
 Well here we go! First I painted his skin with Model Master skin tone (
| Home |
| Copyright © 2009- 2022 ArtisticHobbies.com - All rights reserved |