| ArtisticHobbies.com |
|---|
| Hobby Resources * Model Building Projects * Modeling Resources * YouTube Channel |
| OTHER WEBSITES * ArtisticReefs.com |
Armor Diorama Build |
In this tutorial, we will teach you how to build a diorama scene for either a 1/24 or a 1/25 scale armor model or RC tank. As always we will also include part numbers throughout this tutorial. Keep in mind that this diorama build can be used for other scale models also.
First, what is a diorama? A diorama (Above) is a mini-world or landscape. You can create your own little world of armor and or figure models that can appear as a freeze frame of a historic event or anything else you want to be. Theirs no right or wrong when it comes to making a mini-world. It’s really your interpretation of what it should look like at that period of time. Maybe your diorama is based on old photos or something you saw on TV. But one thing is for sure is that when you build a diorama for the first time. You will see how the diorama gives your model new life and a realistic feel to it. I think a lot a people are intimidated by even thinking of building a diorama. Hopefully this tutorial will show you how fun and enjoyable this project can be. The main thing is just having fun! Isn’t that what modeling is suppose to be all about, FUN! Anyway, lets get started. The first decision you will have to make is how big do you want your diorama to be? You might want your finished diorama on a bookshelf in your den or somewhere else. Just make sure your finished diorama is going to fit wherever you place it in your home of office. The other thing you must consider is the scale of your model. For this build we are using a 1/25 scale RC German Tank Destroyer, so the diorama size must not be to small for the scale model your making it for or it won't fit correctly. Since we are using a 1/25 scale German Tank Destroyer in this diorama build and it’s going onto a bookshelf. The size I came up with was 10.25” x 16”. The size fits great on my bookshelf and it’s not too small for the tank.
So I cut the board to 10.25” x 16” with a good circular saw. Once you have your entire cutting finished, it’s time to nail the molding to your board. You Where the molding edges meet on the corners, you might find a small gap. If so, you can fill them in with wood putty, also cover up any nail holes with the wood putty only if the nail holes can be seen. All my nailing was done from underneath (Above), so no nail holes to be covered up for me. Now with your base finished, you can get into making your diorama base, which is made
Next comes painting your base (Left). I used a red mahogany wood stain ($4.38), which I applied to the molding only. You can paint your molding any color you wish based on your homes decor. The red mahogany wood stain is pretty smelly, so make sure you do your staining outside or in your garage and please wear a good paint mask especially if you have kids helping you.
|

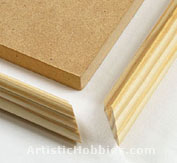 Every diorama needs a good foundation, meaning a good base to build your diorama on. Your base can be made from just about any kind on wood. You can use pine, particleboard, or plywood to mention a few. I’m using IDF Board. You can find it at your Home Improvement Centers on the cheep for about $9.48 for a 2x4 foot size and the board is 1/2 inch thick. I will also be putting molding around the edges to give the board a decorative feel and look.
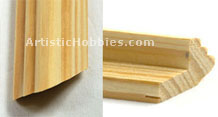 Then I cut an 8 feet pine lip decorative molding (Right) to size which cost about $6.88 using a electric miter saw. If you don’t have an electric miter saw, you can use a miter box with a handsaw. This will work just as good as the electric miter saw. Take your time measuring the decorative molding before cutting. Measure twice and cut once as the old saying goes.
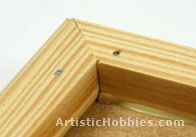 can nail the molding using small 3/4 inch finish nails or if you have an air finish nail gun like I do, this can speed up your job much faster. Make sure before you nail the molding in place you use some wood glue. The wood glue will add extra strength to your fished base.
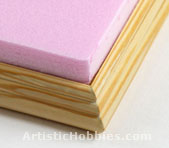 from 1/2 inch insulation foam. The pink insulation foam board can be found at your local Home Improvement Centers for about $9.95 for a 4x8 sheet. With this pink insulation foam board you can make just about anything you want including mountains, hills, buildings, bunkers, stone walls and much more. And best of all it cut like butter using a
 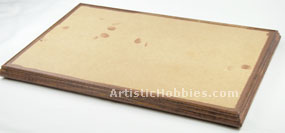 Cut the foam board (Above) to fit the inside dimensions of your framed board you just made. This piece of foam board is for the ground of your diorama, which you will build off of.
| Home |
| Copyright © 2009- 2022 ArtisticHobbies.com - All rights reserved |