| ArtisticHobbies.com |
|---|
| Hobby Resources * Model Building Projects * Modeling Resources * YouTube Channel |
| OTHER WEBSITES * Artistic Reefs |
Taigen Metal Tiger I Kit Build - Page #9
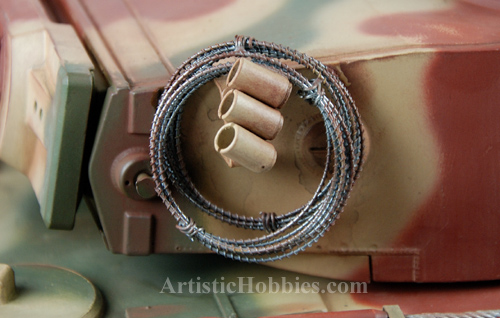
The next picture shown is the barbed wire I put on the turret. The barbed wire is actual one barbed wire that I took apart and cut to make two roles of barbed wires. Again I used my PanPastel weathering kits to further enhance the weathering of the barbed wire.
Before I start putting more accessories onto the tank, I need to address the wheels (Below Picture). The wheels I have put off until now because I have been undecided in either just weathering them the way they are or painting a camouflage theme on them to match the rest of the paint scheme.
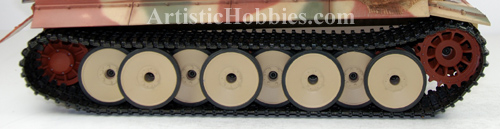
Well I decided to go the extra mile and paint a camouflage theme on them. This means taking off the font wheels so I have access to the wheels in the rear. The rear wheels I will leave on the tank but will have to take off the rubber tires, which will be easy to do since there not glued onto the wheels. The tracks will have to come off to but there also easy to do. Some will say this is just poor planning on my part because they should have been camouflage painted beforehand? They are correct in saying that to a certain point but that’s what being creative is all about. Sometimes you change your mind mid stream and you go from there. For me this is no big deal and is part of the enjoyment of tank modeling. Plus you guys get to see different options that you can do to your Tiger I model kit.
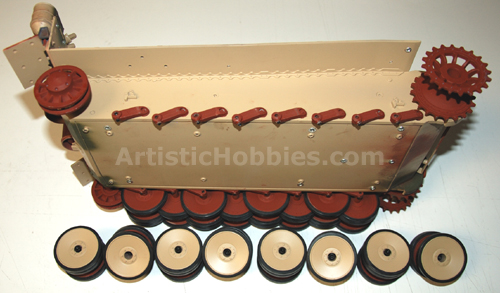
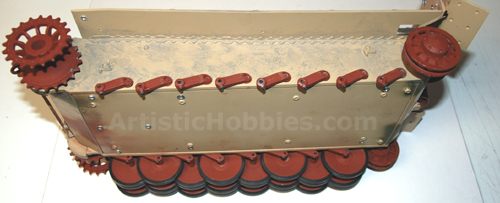
The picture above shows the lower hull with the wheels off the Taigen Tiger I tank. Before I get started on the wheels and one of the things you will notice with the wheels off is that the sides of the hull need some weathering. So I grabbed my black wash again and started to put some on the sides of the lower hull with a brush. Once applied I started to color sand the whole area with the black wash. By color sanding the black wash, you are creating dirt and grit. Once finished color sanding I dabbed my brush on the whole area to get rid of any black wash streaks created by wet sanding and then let try for about an hour. Once dried I once again dabbed my black wash all over everything and once again let dry for about an hour. The main reason your dabbing the black wash on is to create splatter marks.
Idea: Don’t forget everyone that underneath the tan color is red primer. So one thing you could do differently while color sanding is keep sanding different areas until you reach the red primer. This would be a great way to make it seam that the tan color is starting to peal or rub off naturally. There’s no need to go overboard on this area because it wont be seam very much once the wheels are put back on the tank.
One thing some of you may want to do is use your PanPastel weathering colors to add more weathering detail to the sides of your Taigen Tiger I tank. To be honest everyone, instead of using the black wash on the sides of the lower hull, you could just use the PanPastel weathering colors. You could also experiment color sanding the PanPastel weathering colors with a little water to see what kind of different affects you can achieve.
Now lets get started on the wheels. One thing you will need to do first before painting the wheels is to remove the rubber tread from the wheels. Once the rubber wheel treads are removed, the fun can begin. First I airbrushed using Model Master Burnt Sienna paint using my SparMax SP-35 Double Action Airbrush at about 21 PSI. The 21 PSI is referring to the air pressure going into my airbrush.
Once I finished airbrushing the red color on the wheels, I let everything dry for about an hour. Then I airbrushed the Model Master Dark Green onto the wheels. This was the first time I have camouflaged tank wheels before and in my past builds I have always left them a single color until now. I really had no set pattern I wanted to do before starting, I just basics just the creative juices flow and hoped for the best.
Tip: Please keep in mind everyone that I did thin the paint to the consistency of milk before putting the paint into the airbrush. This is very important so you don’t clog the airbrush with paint. The thicker the paint, the more air pressure you will need to force the paint through the airbrush, which isn’t good for camouflage painting. That’s why you want a very low air pressure (22 PSI or lower) to avoid any over spray of paint and to get nice clean lines.
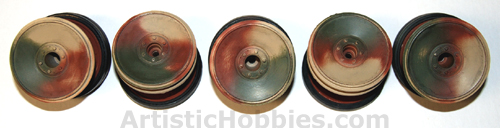
Once I was finished airbrushing and everything was dry. I when color sanded the colors to add wear and tare to the wheels. I color sanded using a couple of dabs of my black wash to make it easier to sand and also to create some grit/dirt. Drag that grit/dirt into the nooks and crannies of the wheels since that’s the areas were you will find the most dirt buildup on the wheel. Once finished, let everything dry. I then applied about 2 coats of my black wash to the entire wheel. Please keep in mind that I let each coat dry for about 20 minutes.
| Home |
| Copyright © 2009- 2024 ArtisticHobbies.com - All rights reserved |