| ArtisticHobbies.com |
|---|
| Hobby Resources * Model Building Projects * Modeling Resources * YouTube Channel |
| OTHER WEBSITES * ArtisticReefs.com |
Started: 8/14/2013
Pages Updated: 1/29/2014
Build instructor: Gene Wilson
Taigen's All Metal Tiger I RC Tank Kit Build
In this tutorial, we will show you how we painted the Taigen's all new metal Tiger I RC kit, which is now in-stock on our website. This isn't really a build tutorial, but the steps I took to paint this new Tiger I kit.
First off, we would like to thank the Imex/Taigen Companies for giving our company this opportunity in receiving this new Tiger I model kit before it went into production so we could evaluate and give feedback in making this new Tiger I kit even better. We received this kit back in August of 2013 and have been working on it ever since including giving feedback back to the Imex Model Company every step of the way. Our feedback was used in updating the manual to help builders better understand how things went together and our feedback was also used in making some changes to some of the parts that we felt needed to be updated before production started. We feel very privileged as a company that we were chosen to evaluate and give feedback on this new Taigen Tiger I model kit in, which we feel will be a great model kit that everyone will enjoy building including new model builders.
A little about the model kit first: This is the first time that Taigen and the Imex Model Company have teamed up to make a metal Tiger I RC tank model kit that you put together. By our estimates, the structure of this RC kit consists of about 75% metal pieces with the rest being a very hard plastic. The kit is called a 3in1 kit because the kit includes some of the industries firsts including options for either making this Taigen Tiger I tank an IR or BB shooting tank. You can also make this RC tank kit a static model if you prefer. 
The only thing not included in the model kit is the electronics, 2.4GHz radio, wiring harness and smoke unit but the kit does include the turret rotating motor, recoil unit for IR only, BB shooting motor, IR sensor, metal 4:1 gearboxes and much more. Another great feature is a manual that is in full color and updated and down-loadable from Taigen/Imex website. We will post that link here once available.
The kit is packaged and lettered/numbered in a way that it makes it easy to understand and build especially if you’re a first time model builder. What really helps is the colored manual, which is very detailed in the instructions on how everything must be put together. At the beginning of the manual is a detailed parts list with letters/numbers that coincide with each part. All parts bags are then lettered/numbered and coincide with the page sections in the manual, making it easy to follow and understand even for a first time model builder.
When you first open up your model kit, you may be overwhelmed by the amount of parts that are included in this kit (about 529 pc). Compared to Tamiya’s full option RC kit, this kit has it beat by the amount of parts that are included.
Updated Notes: Since we have received the final new Tiger I kit the other day, we were pleased to find some interesting changes to the kit. One of the things I have noticed right off is that the road wheels were already built for you, saving a lot of assembly time. Another item worth noting and was one of the area’s we hoped would be changed is the main hatch assemble on the turret is now put together for you. I’m glad this was changed because it would have been a nightmare to put together for some of you.
SO LETS GET STARTED: The paint and items used for this Taigen all metal Tiger I kit are the following.
- Krylon Ruddy Brown Spray Primer - 2 cans used
- Tamiya TS-46 Light Sand (TAM85046) 4 Spray Cans used
- Tamiya TS-48 Gunship Gray (TAM85027) 1 can used
- Model Master Dark Gray (TEP4726) 1qt
- Model Master Burnt Sienna (TEP4607) 1qt
- Model Master Dark Green (TEP4726) 1qt
- Model Master Steel (TEP4679) 1qt
- Model Master Wood (TEP4673) 1qt
- 280 Grit Sanding Sponge (AH1306) 1qt
- SparMax SP-35 Double Action Airbrush (SPA35)
- Taigen Tiger I Grill Set (TAG120008) 1qt
- Taigen Tow Cables (TAG120010) 1qt
The main reason we used Krylon's Ruddy Brown Spray Primer is becasue it's very close to the red primer color that the German's used to prime there tanks in WWII. At one time you could find this primer at your local Walmart store but ended up buying from a company online. Very hard to find these days for some reason. This primer can be used on metal and plastic parts.
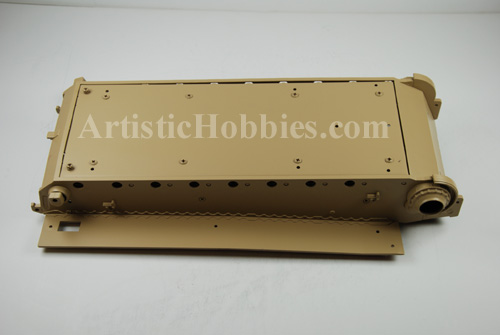
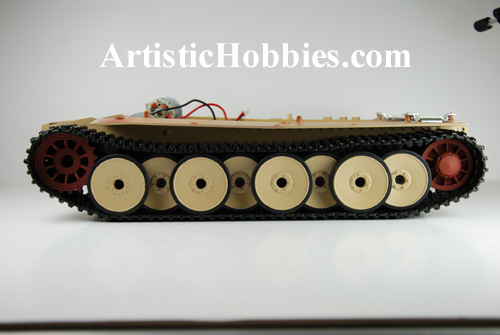
This first pictures below shows steps #1-11 finished. Primed and pained using Tamiya TS-46 Light Sand (TAM85046). Notice in the picture I didn't install the roan wheel suspension arms shown in step #12 but did install the rear idler arms. If you installed the roan wheel suspension arms, you wouldn't be able to paint behind them very well. So we primed and painted these separately before installing. Dont forget to sand down the lower hull #D before priming.
This next pictures below shows front drive sprocket, rear idler wheel, suspension arms and road wheels primed and painted. To prime and paint the road wheels, you will have to remove the rubber tread from the road wheels before priming. This is very easy to do and you will get a nice professional paint job by doing so.
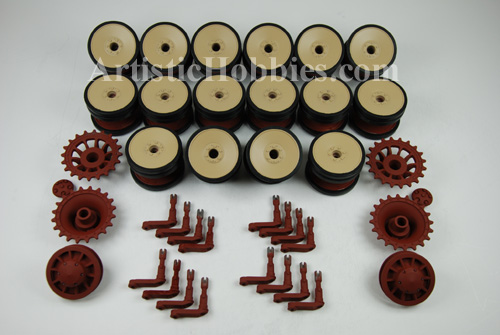
The front drive sprocket, rear idler wheels and suspensions are will be left primed but you can paint them if you want. I felt it wasn’t necessary to sand these parts first before priming because the metal is not smooth but very porous. So the primer will stick very well to these parts without sanding first.
This would be a good time to add detail to your drive sprocket, rear idler wheels and road wheels if you want. We ended up adding some detail to the bolts on the front drive strocket and rear idle wheels using Model Master Dark Gray. We will add detail to the road wheels later on.
| Home |
| Copyright © 2009- 2022 ArtisticHobbies.com - All rights reserved |