| ArtisticHobbies.com |
|---|
| Hobby Resources * Model Building Projects * Modeling Resources * YouTube Channel |
| OTHER WEBSITES * ArtisticReefs.com |
Started: 8/18/2014
Updated : 8/28/2014
Build instructor: Gene Wilson
Billet Works Designs RC Rock Crawler "Thing" Chassis Toturial
In this tutorial, I will show you how to assemble a RC rock crawler “Thing” chassis kit from Billet Works Designs. Billet Works Designs is an exclusive designer of RC rock crawler products and we are happy to say we will be carrying some of their products, which can be found in-store or on our website.
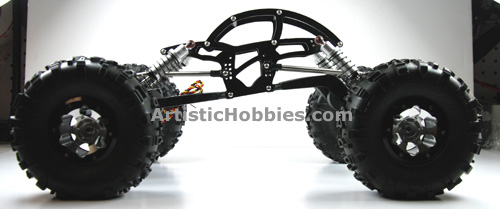
The name of the rock crawler chassis we will be building today is called the XR “Thing” (Part # BWD052) and can be found on our website or in-store. This RC rock crawler chassis is a 10th scale crawler with multi linked suspension, which can be bolted to a 10th scale motor on axel configuration, also known as a MOA. The kit was designed to fit on the Axial XR10 axles but also can be mounted on the new RC4WD Bully 2 Comp axles shown at the end of this tutorial. Can also be mounted to the older RC4WD Bully 2.2 axle's as well.
This crawler chassis is made from Delrin, which is a very strong plastic which combines toughness and abrasion resistance with stiffness, strength and is very impact resistant making it the perfect material for constructing a RC crawler chassis like this.
Kit comes with everything you need to complete an entire chassis for one RC rock crawler, which includes 2x Machined Delrin Side Plates, 1x Machined Delrin Skid, 4x Turned Delrin Chassis Braces, 1 Set of Machined Delrin Lower Links for Revo Rod Ends, 1 Set of 3/16" diameter Titanium Upper Links for Revo Rod Ends and hardware for assembly. Top cab is sold separately (BWD0522).
So lets get started; first you will need the following tools to help you along with this project, which should take about an hour to finish depending on your skill set.
- 2mm hex driver (Don’t use electric driver)
- Vise grips and or pliers
- 2x Traxxas E-Revo Rod Ends (TRA5347)
Unfortunately this Chassis kit (Thing) from Billet Works Designs doesn’t come with instructions. So your best to lay out everything first to get familiar with all the parts and to see where all the parts go (shown below).
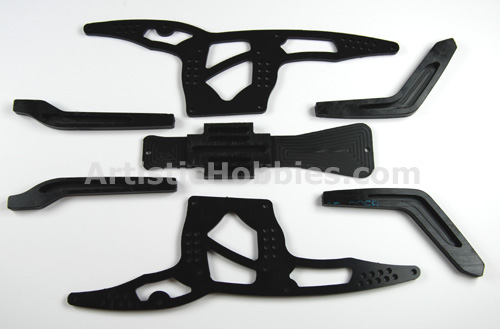
To be perfectly honest, as long as you lay out everything first. Everything will go together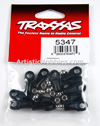 very smoothly even for a beginner. The only area that may be a little confusing is which bolts to use in what area. There’s 4 different sizes of bolts that comes with this RC rock crawler kit in which you will only be needing 3 to complete this chassis kit. All the bolts and where they go will be shown in this tutorial as we go forward.
 Before we can start building the chassis, you will need to start putting the rod end on the ends on each of the upper and lower suspension arms. For this you will need to buy two packages of large Traxxas E-Revo rod ends (TRA5347).
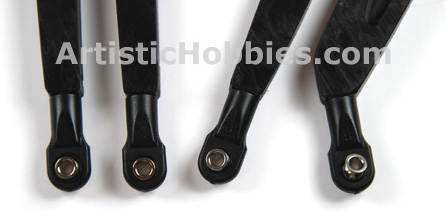
To start this, you will need your 2mm hex driver to screw 16 set screws into each end of your suspension arms. Do not over tighten these set screws or you may strip the inner threads of the links.
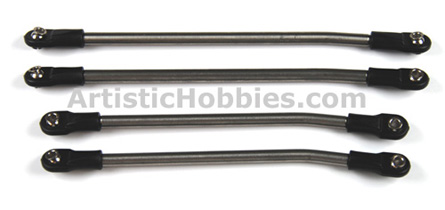
Do this for both upper and lower suspension links. The upper links are made from titanium and the lower links are made from Delrin (Black).
Once you finished this, it’s time to screw on your E-revo rod ends onto each of the set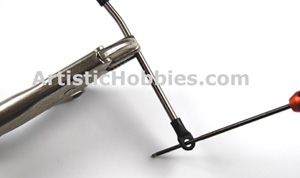 screws you just installed. The best way to do this is by hand tightening each one until you can’t hand tighten anymore. Then use your 2mm hex driver and place the end of it into the eye of the rod end while holding the suspension arm with your other hand or vise grips. Rotate your hex driver clock wise until tight. (Shown right).
You may notice while screwing in the rod ends into the titanium arms you feel some heat. This is normal and is just the friction you are creation while screwing on the rod ends. Also don’t over tighten or you may strip the threads on the rod ends. At this point all your suspension rod ends should look like these.
Next is to start assembling your chassis by taking your 4qt 35mm black rods and attaching them to the upper chassis as show below with your 10mm set screws. The 10mm hex screws are the smallest set screws in your kit. You will need your 2mm hex driver for this, which goes pretty fast when you have the right tools for the job at hand!
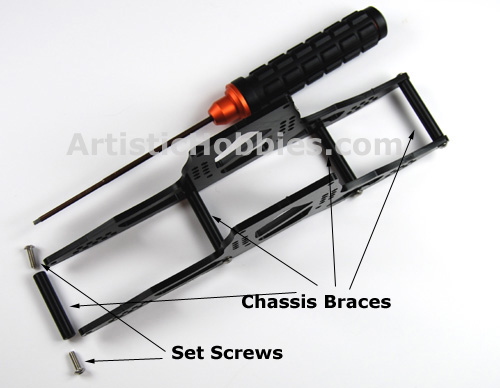
I found it easier to turn your chassis side braces upside down to attach your top braces as shown above.
| Home |
| Copyright © 2009- 2022 ArtisticHobbies.com - All rights reserved |