| ArtisticHobbies.com |
|---|
| Hobby Resources * Model Building Projects * Modeling Resources * YouTube Channel |
| OTHER WEBSITES * Artistic Reefs |
Tamiya 1/16 Full Option King Tiger Tank - Page 5
State 17-19 calls for testing all your electronic include your remote control radio, receiver and charging your batteries.
If you are like most people and have not bought your batteries, battery charger, radio controller and the receiver yet. Don’t worry, all these items can all be bought and tested at a later date. If you have no plans in buying the remote control, receiver and batteries any time soon, than I strongly recommend in you not installing the electronics into your tank. The reason for this is because it’s much simpler in testing your electronics outside of the tank especially if you’re new to building these tanks. If you are not new to building these tanks, than go ahead and install them.
If you do have your remote control radio, receiver, batteries and a battery charger, than start first by charging your 7.2 volt battery which may take about 30-40 minutes to complete.
In the mean time, start by connecting all the electronics shown below which is pretty simple to do on a flat surface like the garage floor.
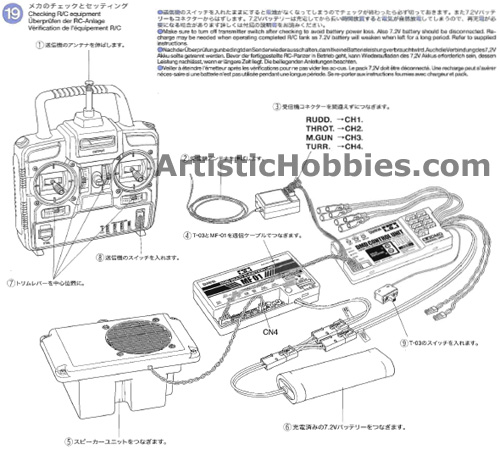
Note about your receiver. There are 4 wires that have numbers on them (1-4) from the DMD unit, which connects to the receiver. More than likely you will have to reverse the channel 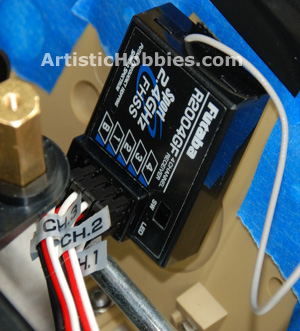 number connections to your receiver shown here. By doing this makes your right stick on your radio for turning the turret, muzzle up and down, firing main gun and firing the machine gun. Your left stick than is for driving your tank. If you don’t do this, than everything will work in just the opposite way.
Once your battery is fully charged, than connect it to the DMD unit as shown in the picture above. Please Note: Make sure that you have the power switch (# 9) to the off position before connecting the battery.
Now first turn on your remote radio first and then switch on the power button (# 9). At this point you will hear your tank come to life.
Next comes time to program your remote control radio to communicate with your electronics as shown in the picture below. This takes about 30 seconds to perform. Once completed, you can now turn off your DMD switch to off and then turn off your radio.

| Home |
| Copyright © 2009- 2024 ArtisticHobbies.com - All rights reserved |