| ArtisticHobbies.com |
|---|
| Hobby Resources * Model Building Projects * Modeling Resources * YouTube Channel |
| OTHER WEBSITES * Artistic Reefs |
Tamiya 1/16 Full Option King Tiger Tank - Page 10
Before I placed any accessory onto the tank it received a coat of black wash, just like the tank received. This keeps the weathered look consistent everywhere.
I think the part that took longest to do out of the entire model build was painting all the 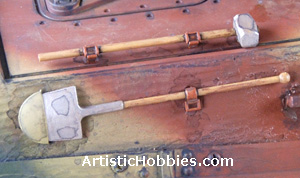 accessories. But if you take your time with each accessory, it will pay you dividends when everything is finished.
They where painted using 3 different Acrylic colors, Steel 4679, Wood 4673 and Earth Red 4707, which was also used on the tank. The Earth Red I used on all the brackets that hold the tools in place on the tank. For the handles I used Wood and then a couple of streaks of Earth Red to highlight the wood grain by using a toothpick. Just dip your toothpick into your Earth Red, wipe a little of the excess off and then drag it along the wood color in a few spots. A little will go a long way so don’t over do it here.
 After everything dries, paint on your black wash, which you made earlier. You will notice that the black wash will get into all the nooks and crannies of your tools, which will give your tools depth. All this takes practice, so take your time and if you make a mistake, then just start over. You know what they say, “Practice makes perfect”.
What’s nice about using Model Master’s Acrylic paint it dries fast, it dries rock hard and cleanup is a breeze with soap and cold water. Once all your tools have dried, you can glue them onto your tank using Testors NON-Toxic Liquid Cement, which I used on this entire project for gluing everything down. Just let it dry overnight before handling.
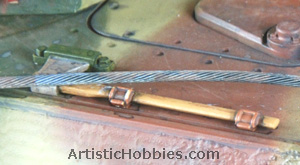
Now lets go over some of the custom parts I made like the tow cables, which where made from 2.0 mm Tow Cable Wire and large Metal Wire thimbles. I also made the pry bars that hang next to the tow cables.
The pry bars are all made from 3/32 metal tubing or you can also use Styrene tubing if you like. I just had some extra metal tubing lying around that I wanted to use up. So it all worked out, but most of the time I would prefer to use the Styrene because it’s much cheaper than using the metal tubing.
In the picture to your right, do you notice the smaller tip at the end of the pry bar? To get 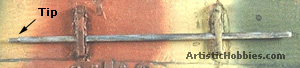 this effect I had to use the tubing so I could insert a rod into it. If it wasn’t for this extra detail, you could have just used rods instead of the tubing. But I wanted to make this tool as realistic as possible. Don’t forget to put your black wash on your new tool.
This tool is mainly used for prying tracks on and off the tank and wheel removal. A very similar tools are used today on modern tanks.
The building of the tow cables will be saves for another tutorial at a later date. We are doing this because we want to spend a little extra time in providing extra detail in how to do this build so a separate tutorial is in order.
| Home |
| Copyright © 2009- 2024 ArtisticHobbies.com - All rights reserved |