| ArtisticHobbies.com |
|---|
| Hobby Resources * Model Building Projects * Modeling Resources * YouTube Channel |
| OTHER WEBSITES * Artistic Reefs |
1/16 Wood Telephone Pole
In this tutorial we will teach you how to build a 1/16 scale telephone pole made out of wood. This is a very simple project to do and can be easily completing in 2 days.
 What you need to buy for this project is the following:
- Round Wood Pole 7/16” x 16” long (Found at Home Depot)
- 1/4” x 1/8” balsa wood (Found at Hobby Lobby)
- Any Dark Wood Stain (Found at Wal-Mart)
- Wood Glue (Found at Wal-Mart)
- 3/64” Metal Rods (ArtisticHobbies.com)
- Gorilla-Glue or any supper glue (Found at Wal-Mart)
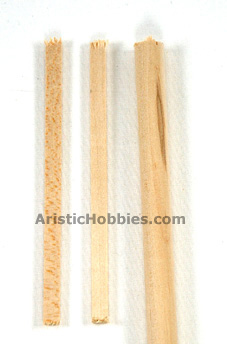
Once you have everything, it’s time to get cutting. First you need to cut your balsa wood into lengths of 4.5” long. You will need 2 pieces per each telephone pole you make. A good way to cut your balsa wood is with a table hobby miter box. This makes sure that all your cuts are nice and square.
Next you will want to drill a 3/16 hole at the bottom of each pole you make. You will be placing your 3/64” rod into this hole for a foundation base to hold your hole up in the ground.
Next cut your metal rods into lengths of 4” long. Once cut insert your rod into your hole you just made in your pole. Use Gorilla-Glue to hold the metal rods in place.
 Next is placing your cut 4.5” long balsa wood strips and gluing them on your pole. Start by placing the first balsa wood strips about 1/4” from the top of your wood pole and make sure it’s centered on your pole. The next one should be placed about 3/8” from your first one. Use a good wood glue and let dry overnight.
Once everything is dried, your ready for some stain. For our poles we used a Mahogany color stain made for wood. The wood is going to soak up the stain pretty fast so you may have to give the wood a second coat of stain. I used an old sock to apply the stain.
If you find you need a second coat of stain, let the first  coat dry overnight. Then apply the second coat the next day. One thing about stains is you don’t want to apply to many coats at one time are your stain my peal on you especially if it’s in the sun all the time.
After your stain is dried, you may want to apply a coat of Polyurethane to protect your stain. The stain I used had both mixed into one stain, which made things easier. The stain is made by Minwax and the color I used is called Bombay Mahogany Satin #380. Just make sure you’re using this stuff in a well-ventilated area, because this stuff really smells.
At this point your pretty much finished. You can add some extra detail to it if your want, like chip marks, but that’s up to you and should be done before you apply your stain.
We hope you enjoyed this very simple tutorial, which can be a fun project for the entire family.
Back to Model Building Projects
| Home |
| Copyright © 2009- 2024 ArtisticHobbies.com - All rights reserved |