| ArtisticHobbies.com |
|---|
| Hobby Resources * Model Building Projects * Modeling Resources * YouTube Channel |
| OTHER WEBSITES * ArtisticReefs.com |
1/25 model - German Tank Destroyer (Page 3) |
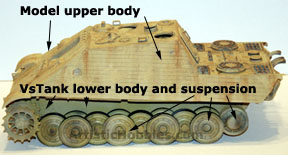
With everything in place it’s a good idea to connect the upper (Model) and lower section (VsTank) body together to make sure everything fits good. It’s a snug fit but it all fits together very nicely. Each time I added a new part inside the upper hull or lower body I made sure I test fitted the two halfs together. When your happy with the fit, now is a good time to connect all the wires to the MCU board to make sure all your wiring, connections and parts are working correctly. If something doesn’t work, check your wiring or check to make sure you connected the correct wire to the correct connection on the MCU board. One thing I did before I disconnected any wires from the MCU board inside the tiger tank Now that the wiring and all your internal parts are fitted, working correctly and glued down. Its time for the fun stuff, the painting. But before I started the painting I needed to apply zimmerit to the upper hull of the model. Since the model didn’t come with any I ended up buying a package that included 2 sheets. The 2 sheets are big enough to do the entire upper hull of the model. I used Micro Weld glue (#M16) to apply the zimmerit to the body. Take your time in cutting the zimmerit because it can break apart very easily. But before I cut any zimmerit I made paper templates first. Then put your paper Once I had all the zimmerit in place it was time to lay down my first color, which was the main color of the tank (Panzer Tan). I mixed two colors together until I got the color I liked. I combined Model Master Acrylic #4796 and #4812 together (50/50). By mixing the two colors together it gave me a color that looked aged already. I airbrushed the upper and lower body parts all at the same time and then let dry overnight. At this stage I looked over the entire paint job for any hairs or dirt that might have gotten into the paint. You will notice in the picture below (left) that I removed the cannon from the upper hull. This just made it easier to paint the body. Next came adding some battle scars to the upper hull of the model. What’s a tank without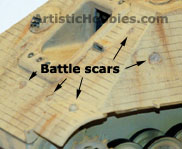 battle scars? So I got out my Dremel tool (DRE7700) again and connected #DRE84922 grinding stone to it. This made great looking shell holes from Sherman’s taking pot shots at the tank. Take your time doing this and don’t put to much pressure on the tool. Let the stone do the work. Work your Dremel tool in a circular rotating manner to give your hole some depth. Don’t make your hole completely round, make them irregular in size and shape. battle scars? So I got out my Dremel tool (DRE7700) again and connected #DRE84922 grinding stone to it. This made great looking shell holes from Sherman’s taking pot shots at the tank. Take your time doing this and don’t put to much pressure on the tool. Let the stone do the work. Work your Dremel tool in a circular rotating manner to give your hole some depth. Don’t make your hole completely round, make them irregular in size and shape.
One of the areas I didn’t plan very well for as you can see was for the extended side skirts and fenders. I did this because at some point I wanted to be able to add on the side armor panels that cover up some of the |
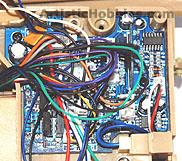 was I took pictures and I also made a detailed drawing of the MCU board and where all the wires came and went to. As you can see (Pictured Right), the wires look like a big mess inside the tiger tank.
As I disconnected a wire from the tigers MCU board I labeled it with a number and a detailed note where that wire went to. By doing this it will save you hours in trying to find out where each wire goes.
was I took pictures and I also made a detailed drawing of the MCU board and where all the wires came and went to. As you can see (Pictured Right), the wires look like a big mess inside the tiger tank.
As I disconnected a wire from the tigers MCU board I labeled it with a number and a detailed note where that wire went to. By doing this it will save you hours in trying to find out where each wire goes.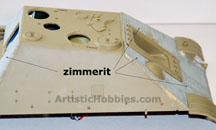 template over the zimmerit and then cut along the lines with a very
 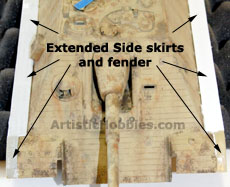 tracks. I glued 2
 | Home |
| Copyright © 2009- 2022 ArtisticHobbies.com - All rights reserved |