| ArtisticHobbies.com |
|---|
| Hobby Resources * Model Building Projects * Modeling Resources * YouTube Channel |
| OTHER WEBSITES * Artistic Reefs |
1/25 model - German Tank Destroyer (Page 2) |
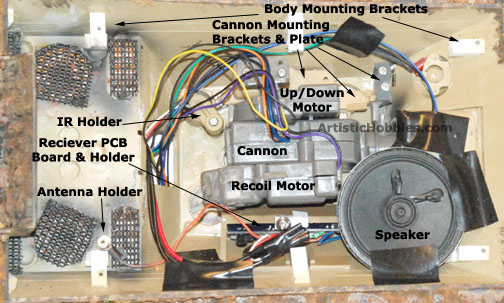
Now if your planning on using the cannon like I did than this is were it gets a little complicated. The challenge lies in were to put the main MCU board, speaker, IR board and crystal housing because the VsTank cannon takes up so much room in the upper hull and the cannon needs room to move up and down inside the upper hull of the model.
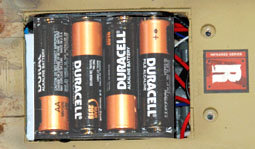
Next came the mounting of the cannon to the upper hull (Above) of the model. The mounting brackets that hold the cannon in-place in the VsTank turret is molded into the turret, so I got out my handy cordless Dermal tool again and started cutting up the turret. By doing this, I don’t have to custom make a plate holder for the cannon. While you’re in the process of cutting up the turret, cut out the IR holder also. Try to reuse as many brackets and parts from the VsTank turret as possible. This will save you many hours from custom making parts. Always plan ahead before cutting up anything. The main issue with this project lies in were to put the main MCU board. Believe it or not, this took me a few days to figure out. To make more room I had to cut the main battery housing out which took You can tell by the picture (left) that the aftermarket battery box fits very snug in the existing battery hole. The down side to this setup is that the existing battery cover won’t fit over the batteries because the batteries hang down to low. But I will tackle this issue later on. You will notice I placed the IR sensor holder behind the cannon (Pictured above). The placement of the IR sensor is located underneath an existing round air vent or at least that’s what I think it is. Anyway, The speaker is about 2 1/4 inches round and about 1/2 inch deep (Pictured above). So at this point I’m starting to run out of room for things. The only good place I found was to the right of the cannon (Pictured above). Make sure you put electrical tape over the wiring connections on the rear of the speaker to prevent shorting out. The electrical tape seen holding down the speaker is just there temporarily so I could test fit it. The crystal connection is located beneath the speaker. |
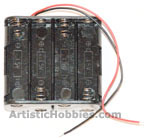
 up a lot of space and replaced it with an aftermarket 8-AA battery holder pictured here. This gave me the additional space I was looking for and more options in were I could place components inside the tank.
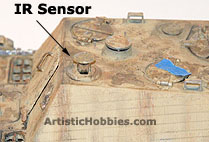 the location turned out to be a great place for it and it looks like it belongs there (Pictured Right) from looking above. Don’t forget earlier when I said I was cutting parts from the tiger turret I cut out the IR holder. I’m glad I did because the whole thing fit like a glove behind the cannon. The only thing I had to do is drill a hole for the sensor so it could stick out of the tank (Pictured Right). Plus there was no room anywhere else for it to go. So everything worked out in the end but that was because I planned thing out before I started gluing things down.
| Home |
| Copyright © 2009- 2024 ArtisticHobbies.com - All rights reserved |