| ArtisticHobbies.com |
|---|
| Hobby Resources * Model Building Projects * Modeling Resources * YouTube Channel |
| OTHER WEBSITES * Artistic Reefs |
1/25 model - German Tank Destroyer (Full RC Conversion) |
In this tutorial, we will teach you how to build, paint, weather and turn a 1/25th scale model into a fully working IR RC tank. Before we get started I just want to tell everyone that this project can be quite challenging especially if you’re a beginner in modeling. Even if you don’t want to turn your model into a full RC tank, there are some great ideas and tips that will help you with your next modeling project. Also keep in mind that this project was quite expensive to build.
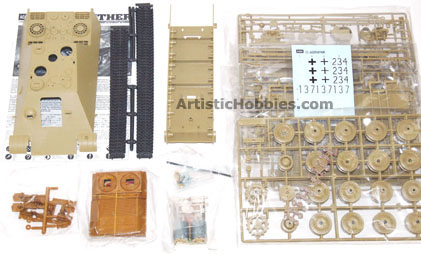
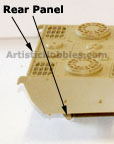
First about the model: The model (Pictured above) is made by Academy, a 1/25th scale motorized wired tank. Wired meaning that the plastic controller that comes with the model is connected to the tank by wires. The model includes a somewhat of a good instruction manual, parts for either an early or late version tank destroyer, 2 motors, rubber tracks and some metal parts. Please note, the model doesn’t include any zimmerit for a mid or late version design. One nice thing about this model is that there are two motors that are fitted onto a metal plate. Each motor drives one set of tracks. For this project I also used a VsTank desert IR RC tank for the lower body, suspension, The first thing I had to tackle was mating the two halves together. You will notice (Pictured Right) that I have glued on the rear panel to the upper hull at an angle. Directions call for this panel to be at this angle. So I didn’t have to make any changes here. After I glued the rear panel on, it was time for a test fit. Believe it or not, it’s almost a perfect fit.
I only had to cut the front portion of the VsTank (Pictured Above) body just a little for a perfect fit. After I was happy with the fit of the two halves I had to make new mounting brackets (Below) so the two halves could be screwed together. This was pretty straight forward in the sense I knew I used two types of glue on this project. I first used super glue for a quick connection and then I applied Micro Weld glue using a cotton swab to get into the nooks and crannies of the connection, and then let dry overnight. This makes for a super tight fit.
Next came the real challenging part of this project (Making everything fit). If you’re not going to use the VsTank cannon in the model, then your home free and you have plenty of room for everything. The only part you have to relocate is the Crystal housing and the speaker and since your not using the cannon you have a lot of free space located in the upper hull for the model. |
 electronics, cannon and controller. So the lower portion of this tank and internal parts are from a VsTank and the upper hull and parts are from the model. The main reason I decided to use the lower body of the VsTank is because of the working suspension. The model has fixed suspension meaning that the wheels don’t go up and down on the tank. And also the durability of the working suspension of the VsTank is much nicer.
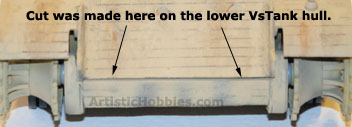
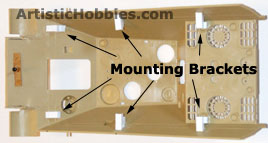 were the brackets needed to be placed on the upper hull of the model but getting the custom brackets placed at the right height and angle was a little challenging. The brackets were made from (#199) 1/4th size styrene strips. I used the screws from the VsTank upper and lower hull connections for connecting the upper and lower hulls of my new model together. After you make and glue your brackets on. Drill your holes into the brackets for the screws and then test fit everything to make sure everything screws together properly.
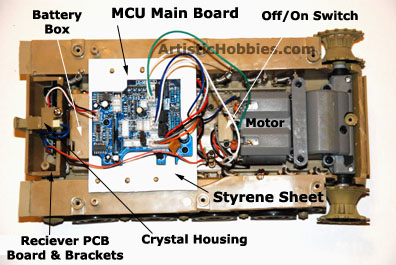
| Home |
| Copyright © 2009- 2024 ArtisticHobbies.com - All rights reserved |