Now that you have your mounds and ditches finished its now time to paint the whole 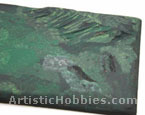 thing. I started with my black acrylic paint that I got at my local Wal-Mart Store and dabbed the black paint just about everywhere. Next I took my dark green paint and randomly dabbed it around and then some light green, but don't over due the light green. Paint until you can’t see the pink color of your foam board, then let dry overnight. thing. I started with my black acrylic paint that I got at my local Wal-Mart Store and dabbed the black paint just about everywhere. Next I took my dark green paint and randomly dabbed it around and then some light green, but don't over due the light green. Paint until you can’t see the pink color of your foam board, then let dry overnight.
While the paint is drying, I got started detailing the large tree. The tree is made by Woodland Scenics and it’s about 9” tall and about 5.5” wide. Right out of 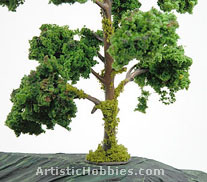 the box it looks pretty good but I wanted to add just a little more detail to the trunk and the leaves of the tree. First I took Model Master acrylic Earth Red paint and used a small detail brush and applied the paint to the branches and trunk. I also dabbed some paint on the leaves to give some extra detail. Next I added some moss to the trunk and branches. I applied the moss using Woodland Scenics light green coarse turf with Elmer’s white glue. I applied the Elmer’s white glue to the branches using an old paintbrush. A little glue will go a long ways so don't put too much on. Again, with paint or glue it’s best to let everything dry overnight. the box it looks pretty good but I wanted to add just a little more detail to the trunk and the leaves of the tree. First I took Model Master acrylic Earth Red paint and used a small detail brush and applied the paint to the branches and trunk. I also dabbed some paint on the leaves to give some extra detail. Next I added some moss to the trunk and branches. I applied the moss using Woodland Scenics light green coarse turf with Elmer’s white glue. I applied the Elmer’s white glue to the branches using an old paintbrush. A little glue will go a long ways so don't put too much on. Again, with paint or glue it’s best to let everything dry overnight.
Since we are finished painting the diorama base and it’s nice and dry, we can get started by adding some detail. The best place to find detail for your diorama is outside in your yard. Look for very small rocks, sticks and branches that might be lying around. You don’t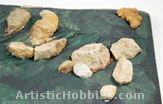 want anything to big, the biggest rock I will be using is 1.5” x 1” in size. want anything to big, the biggest rock I will be using is 1.5” x 1” in size.
As you can see I randomly placed the rocks around the small hill using Elmer’s white glue. I also used Woodland Scenics Course brown ballast around some of the larger rocks for extra detail. A little will go a long way so don’t over do it here.
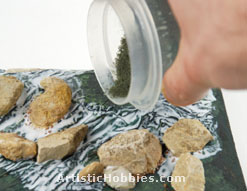 After I let the rocks dry overnight it was time to add some dirt to the hill we just made. To make the dirt I used Woodland Scenics fine turf soil, which is very bark in color, almost a blackish brown. Again I used Elmer’s white glue and applied the glue using an old paintbrush and covered the entire area as shown here (Left) with the glue. I put the fine turf soil in a small plastic container and sprinkled the dirt over the glue. Cover the area very well until you see no more of the painted ground. I also sprinkled on some Woodland Scenics fine turf earth in different places, which is a dark brown in color, which adds contrast to the ground. Let this dry for at least one hour. After I let the rocks dry overnight it was time to add some dirt to the hill we just made. To make the dirt I used Woodland Scenics fine turf soil, which is very bark in color, almost a blackish brown. Again I used Elmer’s white glue and applied the glue using an old paintbrush and covered the entire area as shown here (Left) with the glue. I put the fine turf soil in a small plastic container and sprinkled the dirt over the glue. Cover the area very well until you see no more of the painted ground. I also sprinkled on some Woodland Scenics fine turf earth in different places, which is a dark brown in color, which adds contrast to the ground. Let this dry for at least one hour.
Next you want to spray a mixture of 1 part Elmer’s white glue and 5 to 6 parts water  and mix them both together very well. Then place your mixture into a Woodland Scenics sprayer and spray the entire ground with this mixture. You will notice that some areas of dirt will form very little mounds from you spraying the mixture of glue and water. Pat them down with your hand to and mix them both together very well. Then place your mixture into a Woodland Scenics sprayer and spray the entire ground with this mixture. You will notice that some areas of dirt will form very little mounds from you spraying the mixture of glue and water. Pat them down with your hand to 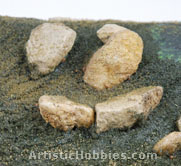 flatten them and let everything dry for 1 hour. Then I used Elmer’s Craft Bond spray adhesive found at your local Wal-Mart store and sprayed theentire area to seal everything up. Let dry overnight. This part is not entirely necessary, but this makes sure that any loose dirt is sealed in very well especially if you add some sand or additional dirt after you sprayed the glue fixture. flatten them and let everything dry for 1 hour. Then I used Elmer’s Craft Bond spray adhesive found at your local Wal-Mart store and sprayed theentire area to seal everything up. Let dry overnight. This part is not entirely necessary, but this makes sure that any loose dirt is sealed in very well especially if you add some sand or additional dirt after you sprayed the glue fixture.
The mixture of Elmer’s white glue and water can be saved in an airtight container for future use. I usually put my mixture back into my empty Elmer’s glue bottle and make sure that the cap is screwed on tightly. I don’t like keeping my mixture in the spray bottle because it’s not airtight. Make sure you wash your spray bottle very good after each use with cold water.
Page 4
|