Front Sprocket Conversion for the 1/16 Taigen Panzer IV RC Tank
7/30/2013
In this tutorial, we will teach you how to install a metal drive sprocket from a Taigen Panzer III onto a Taigen Panzer IV RC tank. Please note that some grinding is required for this conversion.
Items and tools required for this conversion:
- TAG120144 - Taigen metal 1/16 Front Drive Sprocket for Panzer III and Sturm III
- Sandpaper
- 3mm Hex Wrench
- Thread Lock
- DRE7700 - Coreless Dremel with sanding wheel or stone
- 2 extra track links
To start your project, remove the 3mm hex bolt that holds the front drive 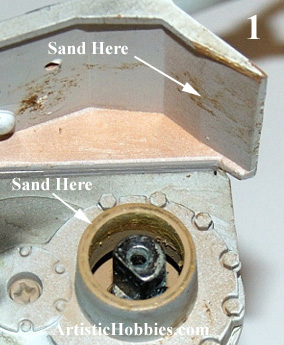 sprocket in place. Once removed, take the tracks off the tank and add 1 additional link per side. By adding this extra link, this compensates for the taller Taigen metal drive sprocket. Tracks will not fit if you dont add a extra link per side. sprocket in place. Once removed, take the tracks off the tank and add 1 additional link per side. By adding this extra link, this compensates for the taller Taigen metal drive sprocket. Tracks will not fit if you dont add a extra link per side.
The Taigen Panzer III drive sprockets is about 1/8” taller than the Panzer IV drive sprocket, resulting in rubbing of the tracks on the front back side of the mud flap, so some grinding of this area is required to have the tracks clear properly.
Use either a very small grinding stone or sanding wheel, which will make fast work on this part of the project. First start by sanding the inside of the fender as pictured here (Picture 1). I personal used a cordless Dremel for this part of the project resulting in fast work.
 Only take off about 1/16 worth of material from the backside of the fender well. Avoid applying too much pressure when sanding because you don’t want to go through the fender. Only take off about 1/16 worth of material from the backside of the fender well. Avoid applying too much pressure when sanding because you don’t want to go through the fender.
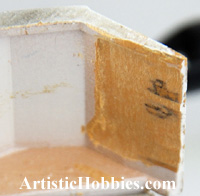
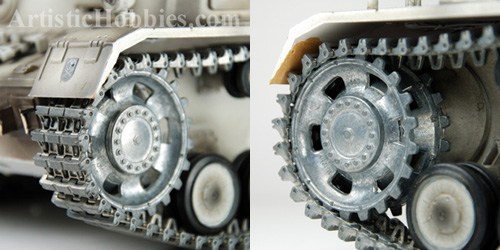
After you are finished with the fender, it’s now time to sand down the plastic ring that resounds the metal 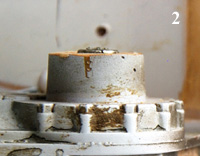 sprocket gear shaft (Picture 1). You want to take off about 1/8 worth of material from this plastic ring or until you are slightly below (Picture 2) the end of the metal sprocket gear shaft. Again, take your time in doing this. sprocket gear shaft (Picture 1). You want to take off about 1/8 worth of material from this plastic ring or until you are slightly below (Picture 2) the end of the metal sprocket gear shaft. Again, take your time in doing this.
The picture on the right shows (Picture 2) you how much material you should take off. It’s a good idea to place the new metal drive sprocket on the gear shaft to make sure it spins freely and it doesn’t bind against the plastic ring. If it binds, than sand down the plastic ring a little more. This step my require doing this several times to get right.
After all the sanding is complete, it’s now time to test fit everything and to make sure the tracks aren’t rubbing against the inner fend well and or that there isn't any binding issues. You may have to do this several time to get right.
If you find you have no binding or rubbing issues, you can now paint the inner fender well. Remember to use lock-Tight on the threads of the 3mm bolt that holds the new metal drive sprocket in place.
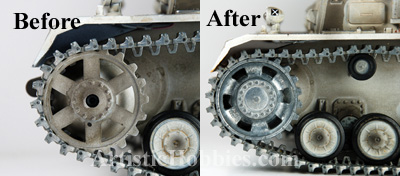
The picture below shows the size difference between the two drive sprockets.

PLEASE NOTE: The TAG120144 - Taigen metal 1/16 Front Drive Sprocket kit comes with metal rear idler wheels. unfortunately even though these idler wheels are the same size, the bolt that holds it in place is to small. So it can't be used in the conversion.
Back to Model Building Tutorials
|